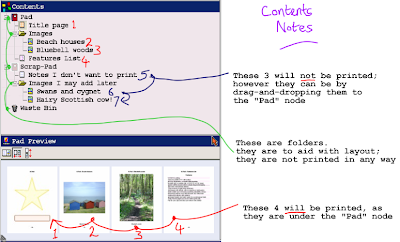
The Contents pane is there to help you organize the layout of your document (usually a booklet).
K-Pad documents are split up into groups of pages.
- "Lined" (text) and "List" groups have as many pages as the amount of text, or list, requires.
- "Clipping" (images), "Squared" (basic DTP, text + images) and "Blank" groups only have one page.
Each page-group is represented in the Contents pane as a branch of the tree.
Additionally, there are three super-groups:
- Pad: for page-groups that you do want to print.
- Scrap-Pad: for page-groups that you do not want to print.
- Waste Bin: for page-groups that you do not want to print.
Deleting
To delete a page-group, right-click on that page-group's branch, and select "Delete". This will move the page-group to the Waste Bin. If you are already deleting from the Waste Bin, then the page-group is deleted permanently.
Note: upon save, the Waste Bin contents are not deleted. They can only be deleted through the menu.
Moving
You may also drag-and-drop page-groups (within the Contents pane) to move them between the three super-groups, as well as within a super-group to change the ordering.
Adding Initial
On starting a new project, you may add a new page-group by simply finding the pane (Lined, Blank, Clipping, Squared), and modifying it. A new page-group branch is automatically added to the "Pad" super-group.
Adding Additional
If you wanted to, for example, add another Clipping page to your document, click on the "Add new Clipping Page" icon of the Contents toolbar.
Alternatively, right click on the folder branch and select "Add->Clipping".
You may also add a folder ("Add->Folder"). These are not printed, they are simply to allow you to group together page-groups.
Copying
You may copy a page-group, by right-clicking on it and selecting "Add->Copy".
Renaming
Rename a branch by double-clicking on it, to ready it for typing. You may also right-click on it and select "Rename". Branch names can be used in your pages' headers and/or footers using the %S code.


 About K-Pad
 Screenshots
 Download
 What's New
 Setting up a New Project
 Booklet Sizes
 Creating a Text Project
 Headers and Footers
 Contents Pane
 Clipping Module
 Squared Paper Module
 Preview and Printing
.png)

No comments:
Post a Comment