2. (optional) Decide on the type of page format (booklet option) you want
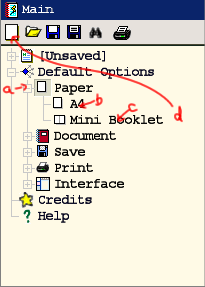
 a) Open the "Default Options->Paper" branch of the "Main" panel
b) Change paper type as necessary - depending upon the type of paper in your printer (UK generally uses the A4 standard)
- right click for menu, and select.
Note: if you are creating a CD, DVD or Blu-Ray Booklet, skip to part d).
c) choose the booklet type you want:
- right click for menu, and select:
-- full-size (no booklet; Portrait or Landscape orientation);
-- half-size (Booklet or Thin Booklet; for A4 paper this would produce an A5 booklet);
-- quarter-size (Mini- or Wide Mini-; for A4 paper this would produce an A6 booklet).
-- 1/8-size (Micro- or Wide Micro-; for A4 paper this would produce an A7 booklet).
-- 1/16-size (Nano- or Wide Nano-; for A4 paper this would produce an A8 booklet).
d) Click on the New icon in the toolbar to apply these default changes to a new file.
3. Basic details - in the "Main" panel
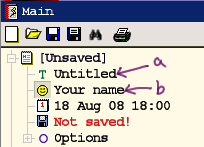
 a) Give the project a title:
Double click where it says "Untitled", and type in a title;
b) Add an author (if not already set by default options):
Double click where it says "Your name", and type in your name or alias.
4. (optional) Presentation details - in the "Main Panel"
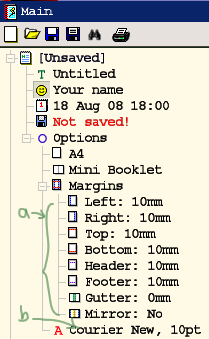
 a) Modify page margins:
In the [File]->Options->Margins branch, double-click on an item you want to change, and type to change it. You may append mm, cm or ", however all values will be displayed in mm.
b) Decide on the font you want to use:
In the [File]->Options branch, right click on the current font and choose the "Font..." menu option to change. This is the basic font that will be used throughout your project.
5. (optional) At this point you might want to save your project and give it a filename:
 Click on either save icon in the toolbar, and use the dialog to save the .kpd file wherever you like.
 You are now ready to add pages to your project!


 About K-Pad
 Screenshots
 Download
 What's New
 Setting up a New Project
 Booklet Sizes
 Creating a Text Project
 Headers and Footers
 Contents Pane
 Clipping Module
 Squared Paper Module
 Preview and Printing
.png)

No comments:
Post a Comment